

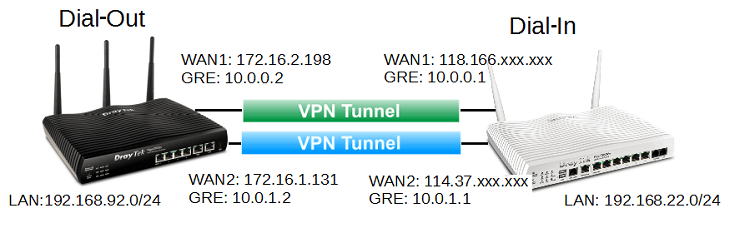
For routers with multiple WAN interface, VPN trunk allows Network Administrator to set up two VPN connections destined to the same remote network and balance the VPN traffic across the two VPN tunnels. This note is going to demonstrate how to set up VPN Trunk for load balancing between two Vigor Routers with the following topology.
Configuring the Dial-in Router (VPN Server)
1. Go to VPN and Remote Access >> IPsec General Setup, type Pre-Shared Key for IPsec VPN authentication. Click OK to save.

2. Go to VPN and Remote Access >> LAN to LAN and click an available index:
- Give a profile name and enable it
- Select "Dial-In" for Call Direction

- Allow "IPsec Tunnel" in Dial-In Settings
- Enable IPsec Dial-Out function GRE over IPsec
- Give an arbitrary GRE IP for local and remote site
- Type the LAN IP of Dial Out Router (VPN Client) for Remote Network IP

3. Create another LAN-to-LAN profile with the same Network settings but different GRE IP.

Configuring the Dial-out Router (VPN Server)
4. On the Dial-out Router, go to VPN and Remote Access >> LAN to LAN and click an available index:
- Give a profile name and enable it
- Select "Dial-Out" for Call Direction and enable Always On
- Select "WAN1 Only" for VPN Dial-Out Through
- Select "IPsec Tunnel" as VPN type in Dial-Out Settings
- Type the WAN1 IP of Dial-In Router for Server IP
- Type Pre-Shared Key for IPsec VPN authentication, this should be the same as the one set on Dial-In Router in step 1.

- Enable IPsec Dial-Out function GRE over IPsec
- Type the GRE IP that matches the VPN profile1 setting of Dial-In Router in step 2.
- Type the LAN IP of Dial-In Router for Remote Network IP

5. Create another similar LAN-to-LAN profile but the following settings should be different:
- Select "WAN2 Only" as Dial-Out Through
- Type WAN2 IP of Dial-In Router for Server IP

- Type GRE IP that matches the VPN profile2 setting of Dial-In Router

Configuring Load Balance on Dial-out Router
6. On Dial-Out Router, go to VPN and Remote Access >> VPN TRUNK Management >> General Setup
- Give a profile name and enable it
- Select the VPN profiles created for VPN load balance as Member1 and Member2
- Select Load Balance as Active Mode and click Add

Now, we can check the VPN status after VPN trunk is established successfully on VPN and Remote Access >> Connection Management page, and we should see both the VPN are up and have traffic.

The VPN load balance algorithm is round robin by default, which means the VPN traffic takes turns with the two VPN connections. The detailed load balance policy, such as weight, source IP, destination IP or destination ports, can be configured by clicking Advanced in VPN TRUNK Management >> Load Balance Profile List.

0 comments:
Post a Comment